A Complete Guide to Organizing, Archiving, and Enjoying Your Family Photos and Videos
In our fast-paced, tech-driven world, it’s easy for those little snapshots of our lives to get lost in the shuffle. Family photos, videos, and memories often accumulate, whether on your phone, tucked away in a drawer, or scattered across old VHS tapes. It’s easy to forget just how valuable those memories are until they’re disorganized and hard to access. But don’t worry - organizing and archiving your photos and videos doesn’t have to be a stressful task. In fact, it’s something that can be enjoyable and rewarding, giving you a chance to reconnect with those precious moments and keep them alive for generations to come.

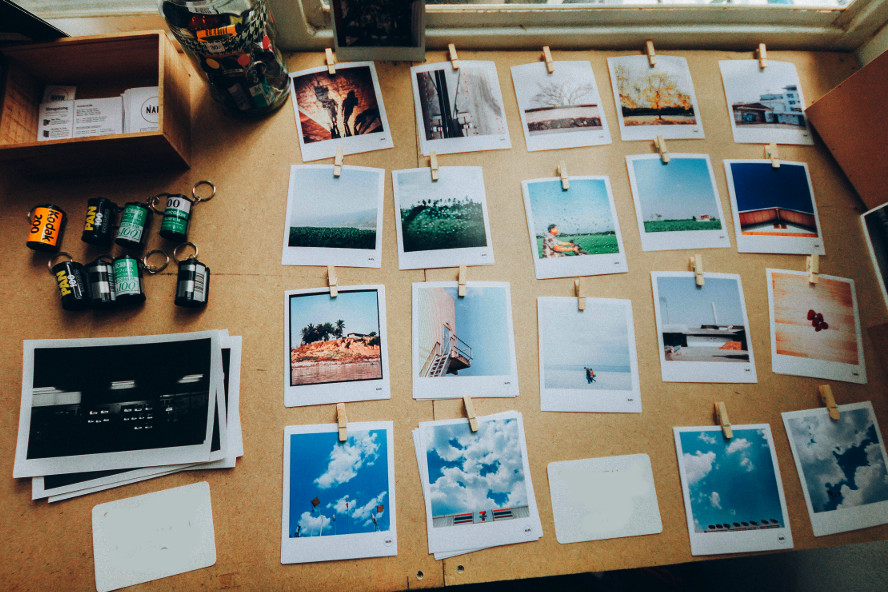
1. Organizing Paper Photos, Negatives, Polaroids, and Photo Albums
If you have a box of old family photos or a shelf lined with dusty albums, you’re not alone. Many of us have piles of physical photos that hold sentimental value but are just gathering dust.
Sorting and Categorizing
Start by sorting everything out. A simple system is to organize by date or event - maybe a “Summer 2010” folder or an album titled “Christmas with Grandma.” Once you’ve sorted, consider how to store your photos - whether it’s in a traditional photo album or an archival box.
Protecting Paper Photos
Photos are fragile - over time, they can fade, tear, or lose their color. Using acid-free storage materials like photo-safe boxes or albums will protect them for the long haul. Think of this step as giving your photos a little extra TLC.
Preserving Negatives
Negatives are like the original version of your photos. They’re a little more precious and require some attention. Store them in protective sleeves and label them so you can easily find that perfect shot later.
Polaroids and Other Formats
If you have Polaroids or instant photos, you know they’re a bit tricky to preserve. They fade over time and can get damaged easily. So, keep them in a safe, cool spot and maybe invest in UV-protective albums to reduce sun damage.
2. Organizing Digital Photos and Videos
Now that most of our memories are captured on our smartphones or cameras, organizing digital photos and videos has become a whole new ballgame. But don’t worry - it’s actually easier than it sounds.
Creating Folders and Subfolders
A little digital organization can go a long way. Try creating folders by year or event (think “2025_Grand_Canyon_trip” or “Spring_Break_2025”). This way, you’ll always know exactly where to look. Pro tip: name your files logically, and it’ll be easier to find those key moments without endless scrolling.
Tagging and Metadata
Most photo management apps will automatically add details like date, location, and even faces to your photos. You can go one step further and add your own tags or keywords. So, the next time you’re looking for that picture of your dog at the beach, you can search “beach” or “dog,” and boom - there it is.
Cloud Storage
We’ve all heard of the cloud, but it’s more than just a buzzword - it’s essential. Storing your photos and videos in the cloud not only keeps them safe but also gives you easy access from anywhere. Google Photos, iCloud, and Dropbox are great options for both storage and sharing. No more worrying about losing everything if your phone decides to take an unexpected dive in the pool.
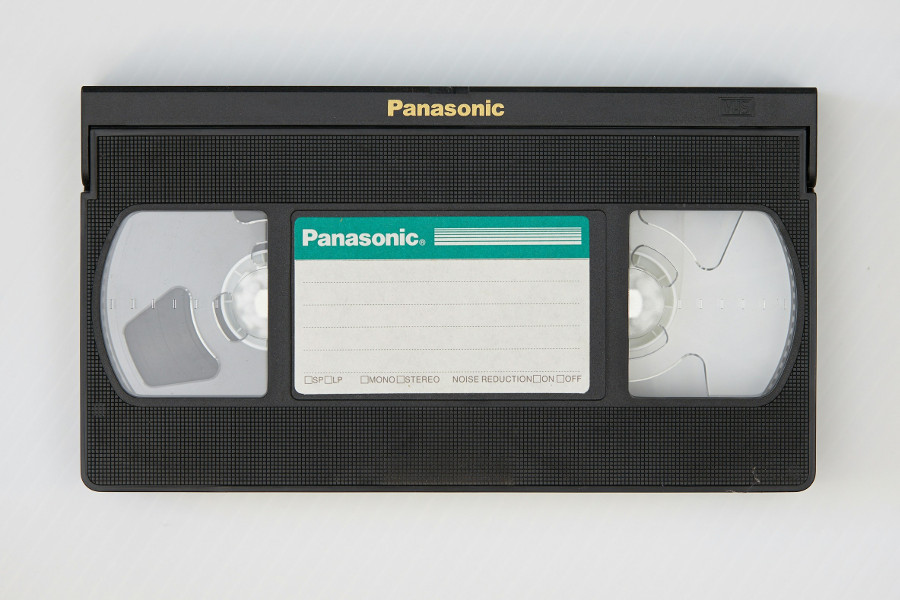
3. Organizing Old VHS Home Videos
Let’s face it: we all have a stack of old VHS tapes sitting in a drawer somewhere. They hold family moments, birthday parties, and vacations - but how do you preserve those when the technology is long outdated?
Converting VHS to Digital
The first step to preserving those memories is to convert them to a digital format. You can either do it yourself with a VHS-to-digital converter or send them off to a service. Don’t let those tapes collect dust when they could be safely stored and easy to access on your computer or in the cloud.
Organizing and Archiving Converted Videos
Once your VHS tapes are converted, treat them like any other video file. Store them in well-organized folders by year or event. This makes it super easy to find that hilarious moment from your family reunion without digging through piles of tapes.
4. Creating Slideshow Videos from Your Favorite Photos
A great way to relive memories is by turning your favorite photos into a slideshow video. It’s an easy way to highlight those special moments and share them with family and friends.
Selecting Photos
Start by picking out photos that tell a story - your summer vacation, the kids’ birthday party, or a milestone moment. Group your photos together so the slideshow flows naturally. You want to evoke those feelings of nostalgia and joy.
Software for Creating Slideshows
There are plenty of tools to help you create beautiful slideshows. Adobe Spark and Canva are user-friendly, while iMovie is perfect if you’re on a Mac. Add some background music, maybe a caption or two, and you’ve got a slideshow that’s more like a mini movie.
Adding Music and Text
Don’t forget the little extras - like music or captions - to really bring your slideshow to life. Music sets the mood, and captions provide context. Timing your photos to the beat of the music? Even better.
5. Scanning Old Negatives and Paper Photos
If you’re serious about preserving your family’s legacy, scanning your old photos and negatives is a game-changer. Not only does it ensure your photos won’t fade away, but it also makes them easier to share with loved ones.
Why Scanning Is Important
Scanned photos last longer and are easier to share. Plus, digital copies are safer - they won’t get lost, damaged, or destroyed by fire or water.
Choosing the Right Scanner
When it comes to scanning, you’ve got options. A flatbed scanner works fine for most photos, but if you’re scanning negatives, you’ll want a dedicated negative scanner for the best results. Higher resolution is always better, so aim for at least 300-600 DPI for photos and 2400 DPI or more for negatives.
Scanning Tips
Scan at a high resolution so you can always make prints later. Once you’ve scanned them, you might want to use photo editing software to restore or enhance the images. Just remember, a little goes a long way.
Saving and Storing Digital Files
Once scanned, save your files in the right format - TIFF for high-quality archival or JPEG for everyday use. Organize your digital files with clear, descriptive names, and back them up regularly.
6. Printing Out Favorite Digital Photos and Creating Themed Albums
Sure, digital photos are convenient, but there’s something about holding a printed photo that feels special. Consider printing your favorite shots and creating themed albums that you can cherish and display.
Choosing Which Photos to Print
When it comes to printing, you don’t need to print everything. Instead, focus on the photos that hold the most meaning - those milestone moments, family portraits, or travel photos that just make you smile.
Printing Services and Home Printing
You can use online printing services like Shutterfly or Snapfish, or even print at home if you have a quality printer. Just make sure you use high-quality photo paper for the best results.
Creating Themed Albums
Once your photos are printed, create albums based on themes - family holidays, your child’s first year, or summer vacations. This way, you’ll have a curated collection of memories that are easy to flip through and share with others.
7. Popular Software and Apps for Organizing and Archiving Photos and Videos
Let’s face it - managing a large collection of photos and videos can get overwhelming. But with the right software and apps, it doesn’t have to be.
For Photos
Apps like Google Photos, Apple Photos, and Adobe Lightroom make it easy to organize, edit, and store your photos. Google Photos even offers free cloud storage for high-quality images, while Lightroom is perfect for those who want a bit more control over editing and organizing.
For Videos
If you’ve got video footage to manage, tools like Final Cut Pro or iMovie are your go-to options. If you prefer free or cheap options, programs like DaVinci Resolve, HitFilm Express, OpenShot and Shotcut offer powerful features for beginners and pros alike. They help you edit and organize your videos, plus add those finishing touches like titles, transitions, and effects.
Backup and Syncing
Finally, don’t forget to back up your media. Use services like Google Drive, Dropbox, or OneDrive for cloud storage and syncing. That way, your memories are always safe, no matter what happens to your devices.
8. Additional Tips and Best Practices for Photo and Video Preservation
- Labeling and Captions: Always label your photos with relevant information. A quick note about who’s in the photo, when it was taken, or where it was taken can make all the difference.
- Backup Systems: Use the 3-2-1 rule: three copies of your data, two different types of storage, and one copy offsite.
- Regular Maintenance: It’s a good idea to revisit your collection every year - check your files, back up new content, and make sure everything is organized.
Conclusion
Organizing and archiving your photos and videos doesn’t have to be a daunting task. In fact, it’s a chance to relive those memories and ensure they’re preserved for future generations. Whether you’re dealing with physical photos, VHS tapes, or digital files, taking a little time to organize and protect your memories will pay off in the long run. So grab those old photo albums, fire up your scanner, or dive into your cloud storage - and start preserving those moments today.